Pages

Monday, May 15, 2017

Automated blinds with Home Assistant, MQTT and NodeMCU

I came across this post on the Home Assistant community forums and decided to give it a try:
https://community.home-assistant.io/t/esp8266-window-blinds-mqtt/14863

I made some updates to the original code by jjhtpc, adding OTA updates. The new code will also retain your previous position when turning off and turning on the blinds if you want it. https://github.com/romahony/mqtt_blinds

Since I have a 3d printer I decided to sketch a quick coupler for the blinds. It can be found on Thingiverse here http://www.thingiverse.com/thing:2320388

The blinds I used are from Home Depot and come in a wide variety of sizes.

Connect the red wire to the Vin pin and the black wire to the GND pin next to it. The white wire is connected to D3.

Parts list:
Cut-to-Width blinds from Home Depot
Futaba S3003 servo
White micro USB Cable (no longer used, replaced with longer cable for direct power)
16.5ft white USB cable
NodeMCU Module
5000mAh Solar Power Bank

Remove blind gears.


With the servo mount still on the servo would sit off-center.


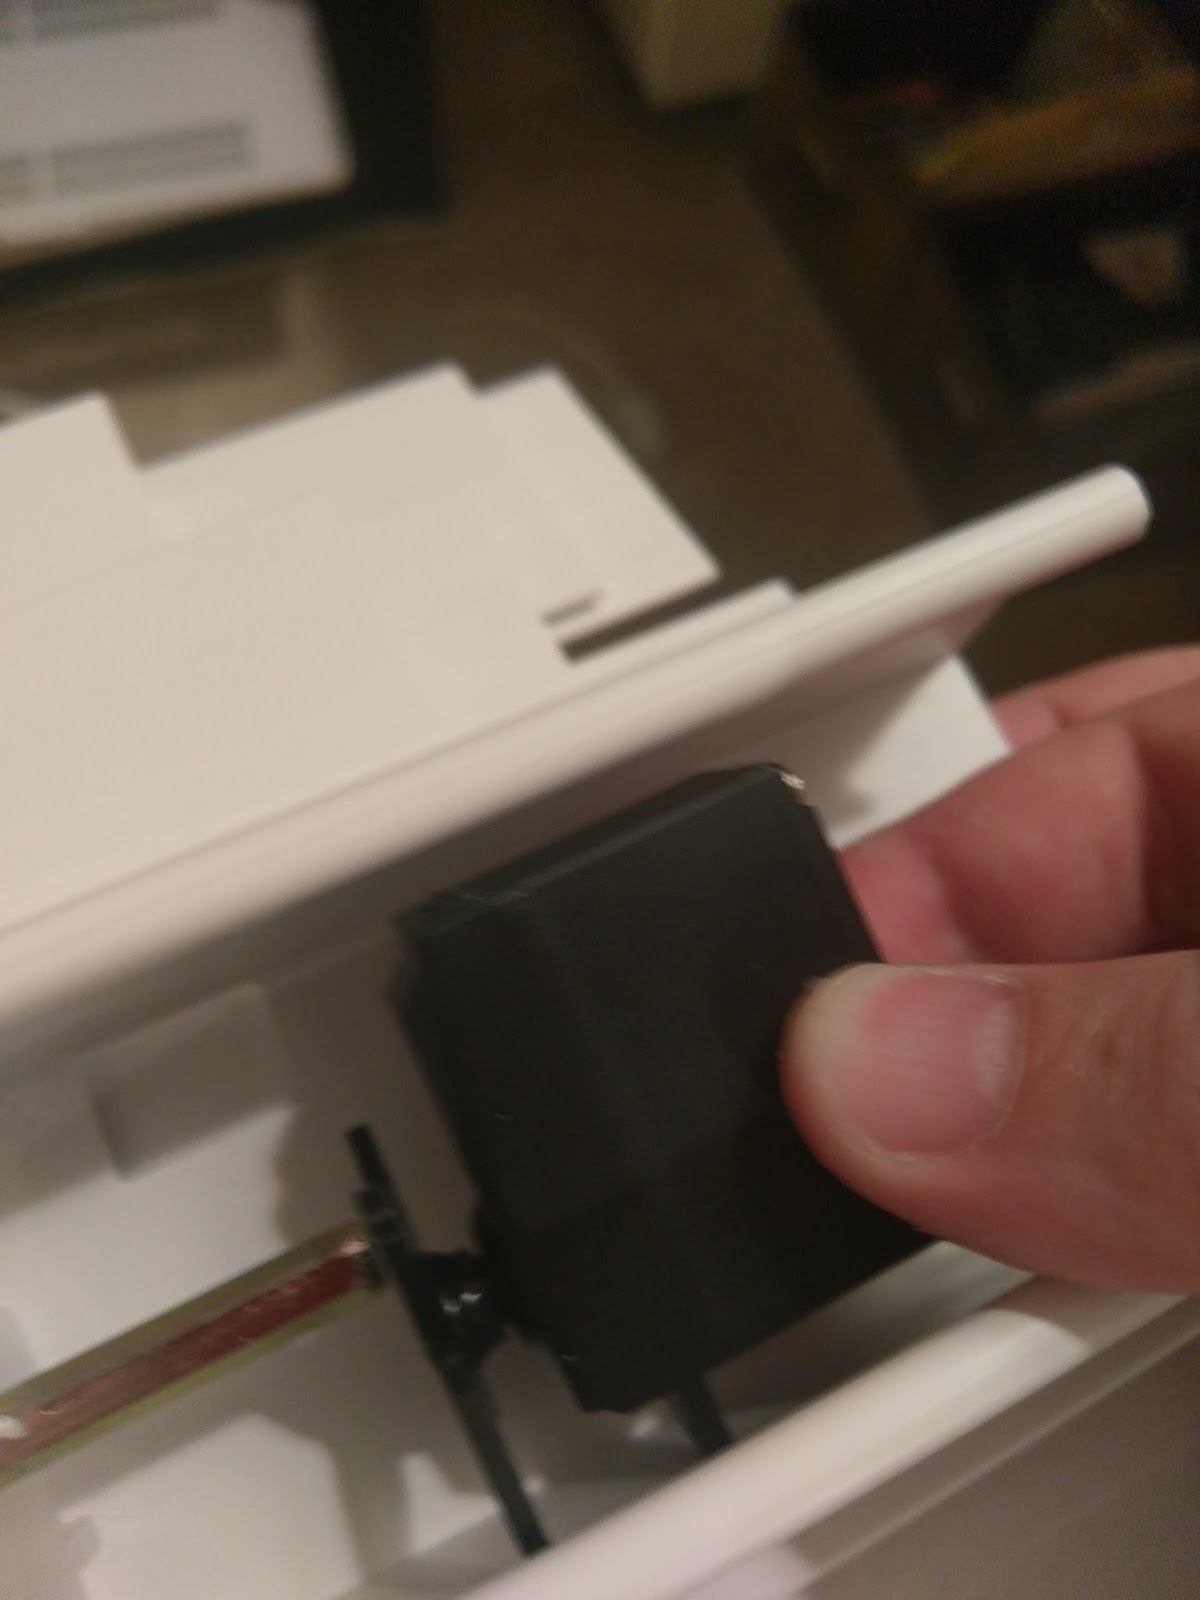
Cut off servo mount.


The servo should now sit dead center to the shaft.


Print and attach the adapter to the servo. 


Cut off the ends of the screws.


Feed the USB cable through the hole left by the gears that were removed.


Attach the NodeMCU inside the blind channel with double sided tape.


Connect the USB cable and install the blinds.


Tuesday, April 10, 2012

NEX-5n Intervalometer for time-lapse photography

Before I got my Sony NEX-5n I was aware that it lacked a method of doing time-lapse built in. The remote was also lacking this feature and there were few third party devices that could do this. I had seen some methods of doing this by adapting the remote to include an intervalometer. So after purchasing the NEX-5n I set about making my own but with an improvement, I wanted to be able to remove the intervalometer from the remote so that I could still use them independently.

Note: this can also be used for Sony NEX-3, NEX-C3, NEX-5 and Alpha series


What I needed:
Opteka RC-3 Wireless Remote Control for Sony
NEEWER® Timer Remote Control RS-60E3
2.5mm Female to 3.5mm Male Headset Adaptor


First I had to open the remote. While it looks like the plastic splits apart, it does not and the face peels of like a sticker. It's easy to push it up from slit that the battery came out of.


Slowly peel off.


Remove screws from circuit board and pull it all apart.


  I cut off the male connector of the headset adapter and exposed the wires.


Drilled a hole in the back cover of the remote.


Using a multimeter I found the two connections on the intervalometer that would trigger the switch. I then found that the two colored wires on the headset adapter corresponded to the right connections on the intervalometer. I traced the connections from the shutter switch on the remote to the back of the board then threaded the wire through the hole and soldered it on to the circuit board.


Carefully reassemble and add a dab of glue to prevent the wire being ripped out.


And that's it. Now just plug in the Neewer timer remote and have fun!


Wednesday, September 14, 2011

Hacked IKEA bar

After looking for a unique but cheap bar solution for our balcony I decided to make my own. Obviously IKEA was a good choice as far as cheap went. Walking around the store I slowly got a plan together in my head. This is what I came up with:


The serving/prep area is on the far side. The Igloo 12-qt. Ice Cube fits snuggly on one of the shelves.


This nice thing is the diversity as the Expedit has many extras you can add.
  • The wine rack insert
  • The door insert
  • The drawer insert
Using these extra parts you can customize this into your ideal bar.


The serving area keeps preparation items off the main surface and discrete.


Parts:

Construction:

Construction is fairly straight forward. The brackets are the only tricky part.

  • Screw only one corner of the Capita brackets to the Numerar countertop at the desired location (a few inches from the edges). Not too tight, you may need adjustment.
  • Align the brackets to the edges of the countertop.
  • Measure the distance between the two bolts on the brackets and use that measurement to drill 2 large holes through the top of the Expedit at the desired spot.
  • Insert the Capita brackets through the holes with the countertop attached and get them straight. If the Vika Byske leg is not on yet you will need 2 people for this. If the holes are not fully aligned you should still be able to adjust because of only using only the 1 screw above.
  • Once you are satisfied that everything is straight and lined up you can use a pen or anything sharp to mark out the remainder of the holes for the bracket screws.
  • Remove the countertop from the Expedit and screw in the remaining screws.
  • Reattach and bolt the Capita's to the Expedit.
  • Attach Vika Byske leg to the countertop.
  • Place the bar where it is needed and adjust the leg until the bar is level.

Monday, May 2, 2011

My Home Theater Setup


TV:
  • Samsung PN58C7000 58-Inch 1080p 3D Plasma HDTV (Black)
  • Samsung SSG-P2100S/ZA Shrek 3D Starter Kit, Black

Remote:
  • Logitech Harmony 900 Rechargeable Remote with Color Touch Screen


A/V system:
  • Onkyo HT-S7300 7.1-Channel Home Theater Receiver and Speaker Package with iPod Dock

HTPC:
  • Running Ubuntu 11.04 Natty with MythTV backend, XBMC as the frontend.
  • nMedia 2000b
  • Intel Core i3 550
  • Gigabyte H55M-USB3
  • Corsair 4GB Dual Channel Corsair DDR3 Memory for Intel Core i5 Processors (CMX4GX3M2A1600C9)
  • Corsair CMPSU-430CX CX Series 430-watt Power Supply Compatible with Intel Core I7 and Core I5
  • ASUS GeForce GT430 1 GB DDR3 Video Card ENGT430/DI/1GD3(LP)
  • Hauppauge 1212 HD-PVR High Definition Personal Video Recorder

Gaming:
  • PlayStation 3 160GB
  • Logitech Harmony Adapter for PlayStation 3


Need to add some decent cable management...

USB3 and HD-PVR

Turns out USB3 is still unstable in Ubuntu 11.04. When the HD-PVR is connected to USB3 will fail with the following in dmesg:

[ 1603.561520] xhci_hcd 0000:04:00.0: ERROR no room on ep ring
[ 1603.561524] hdpvr 9-4:1.0: usb_submit_urb in hdpvr_submit_buffers returned -12
[ 1603.561527] hdpvr 9-4:1.0: couldn't submit buffers

Just switch back to USB2 and the issue should go away.

Tuesday, March 29, 2011

nMedia 2000b

 This is an amazing case that matches my Onkyo receiver perfectly except for the LCD color. The "PRO-LCD OEM" screen must be purchased separately and it turns out that nMedia have stopped making their standard green screens in favor of blue LCD's without updating any of their online material. Grrrr! I sent them an email to see if they still have the older ones lying around but unfortunately they don't. The issue is more than just about visual consistancy with my receiver but also readability and subtlety. The bright blue LCD is neither readable nor is it subtle. Unless you turn your HTPC off at night the screen will be burning your retinas out and startling the natives for miles around.


One good thing is that the screen works great with LCDproc and the LIS driver. For some reason the LIS driver is missing from the Ubuntu LCDproc packages, which is annoying.
What you need to do is:
  • download the LCDproc source and unpack
  • cd into the directory and run ./configure --enable-drivers=all
  • run make
  • *DO NOT* run make install, simply copy the created server/drivers/lis.so to /usr/lib/lcdproc/
  • edit /etc/LCDd.conf and set Driver=lis
  • restart LCDd and lcdproc and configure to your taste


USB issues with HP IR receiver

Every now and then my IR receiver will fail with errors like this in dmesg:
device descriptor read/64, error -71
device not accepting address 12, error -71

When the device does show up in lsusb:
0471:060c Philips (or NXP) Consumer Infrared Transceiver (HP)

I have not ever been able to track down the issue so if anyone has any ideas please let me know.
Tried so far:
  • unloading ehci_hcd kernel module (no longer works as the module is integrated into the kernel)
  • adding acpi=off to the kernel line in the grub config
  • adding noapic to the kernel line in the grub config

Some suggestions have been to run a powered USB hub but I don't want to do that on a sleek HTPC build. I don't reboot that often so I can live with it but a solution would be good.